About Appstle Memberships
The Appstle Memberships app in Shopify helps you create and manage membership plans. It can help increase sales and build customer loyalty.
This guide will show you how to use Appstle Memberships effectively in your Pagefly Page. In order to use this element, the Appstle Memberships app has to be installed on your Shopify store.
- Install Appstle Memberships.
- Installed PageFly.
How To Access The Appstle Memberships
From PageFly Editor
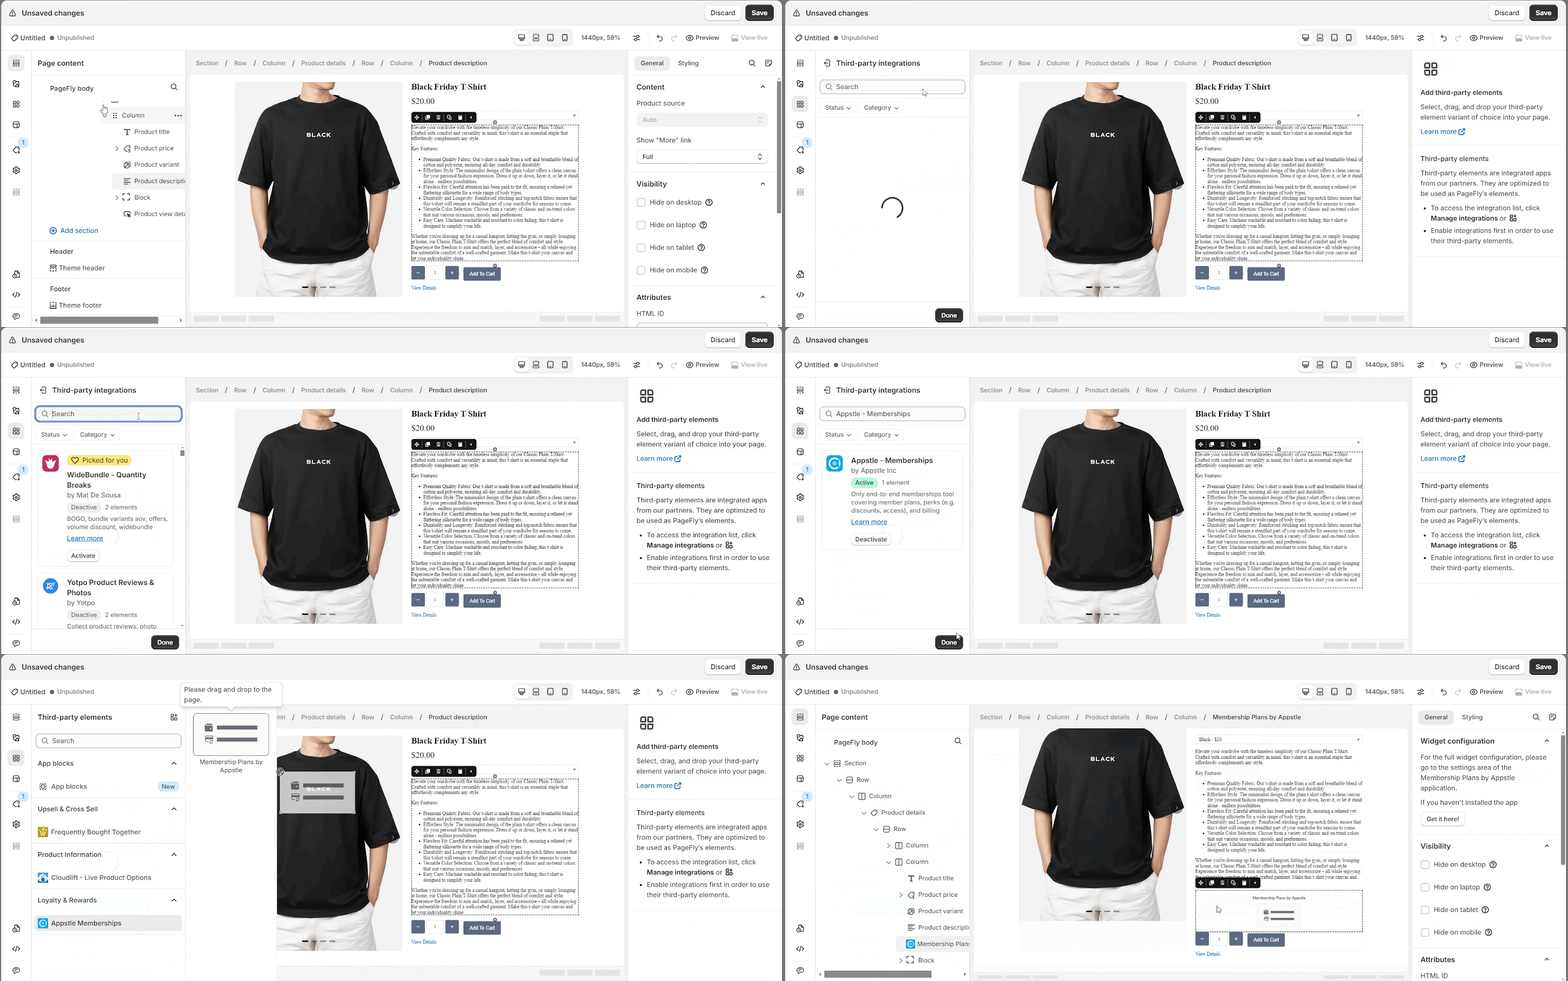
- Step 1: In the PageFly page editor, click on Third-party elements on the left toolbar.
- Step 2: Click on the icon at the top right corner
- Step 3: Search for Appstle – Memberships and and click Activate
- Step 4: Click “Done“ and the element will appear in the “Third-party elements“ menu.
- Step 5: To add it to your page, go to Third-party elements, select and drag the Appstle Memberships element to the desired area on your page.
From PageFly Dashboard
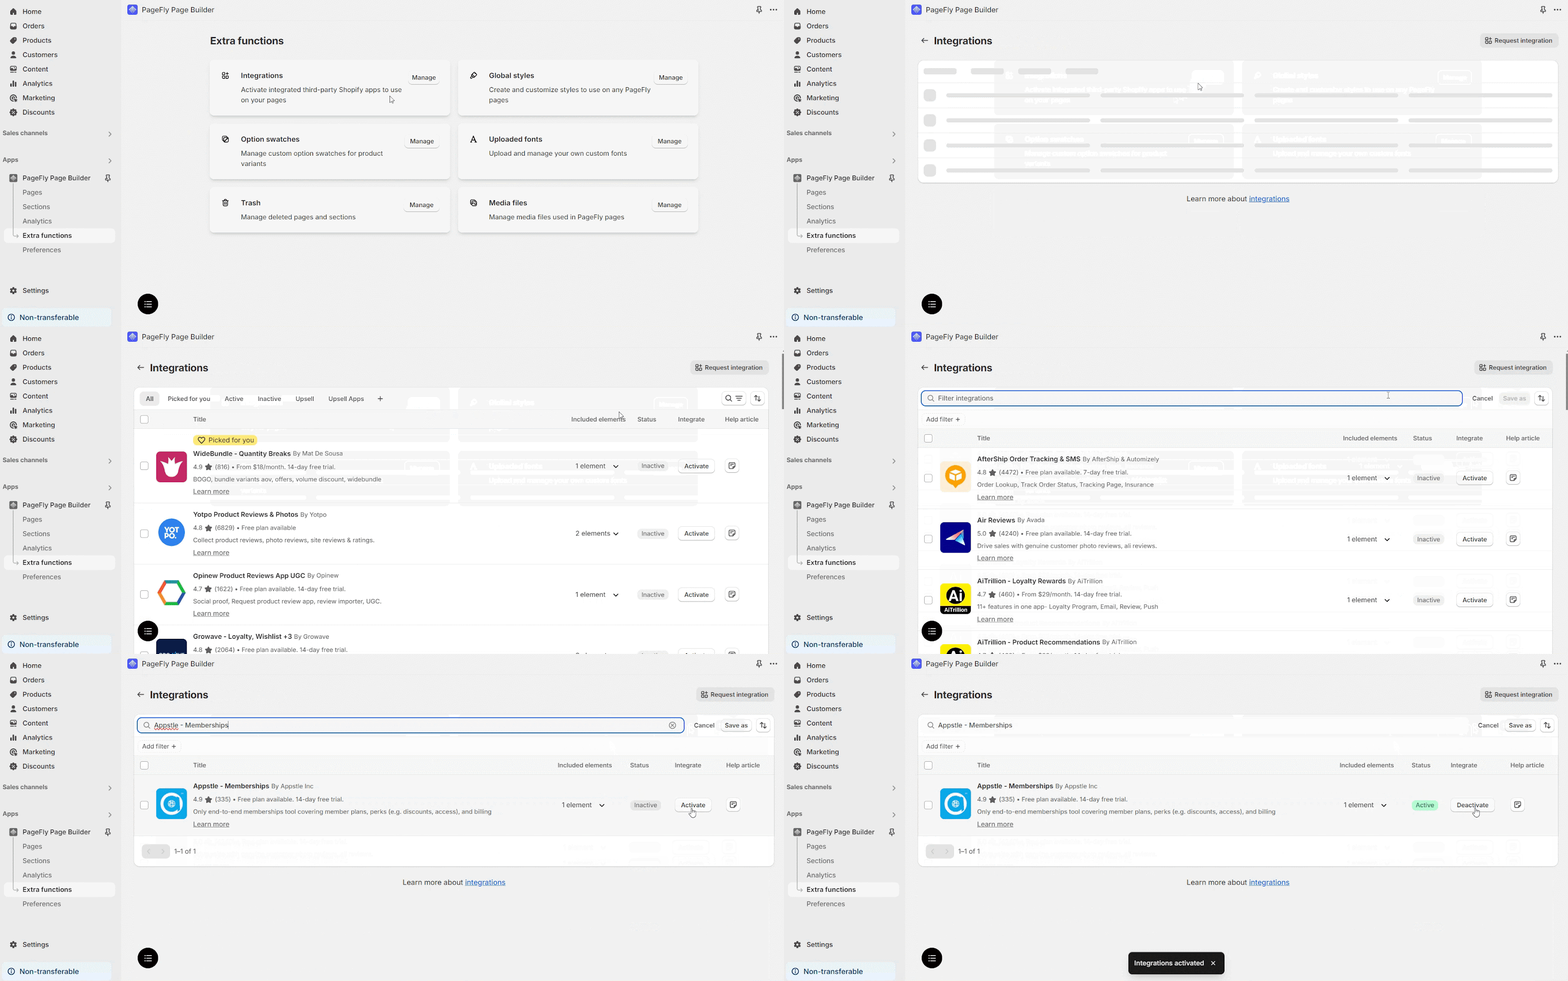
- Step 1: Click on Extra functions on the left sidebar in the PageFly dashboard.
- Step 2: Press the Manage button next to the Integration section.
- Step 3: Search for Appstle Memberships and hit the Activate button.
- Step 4: Add to your page by following the same 4th step as in the PageFly editor.
How To Configure Settings For Appstle Memberships
PageFly’s Settings
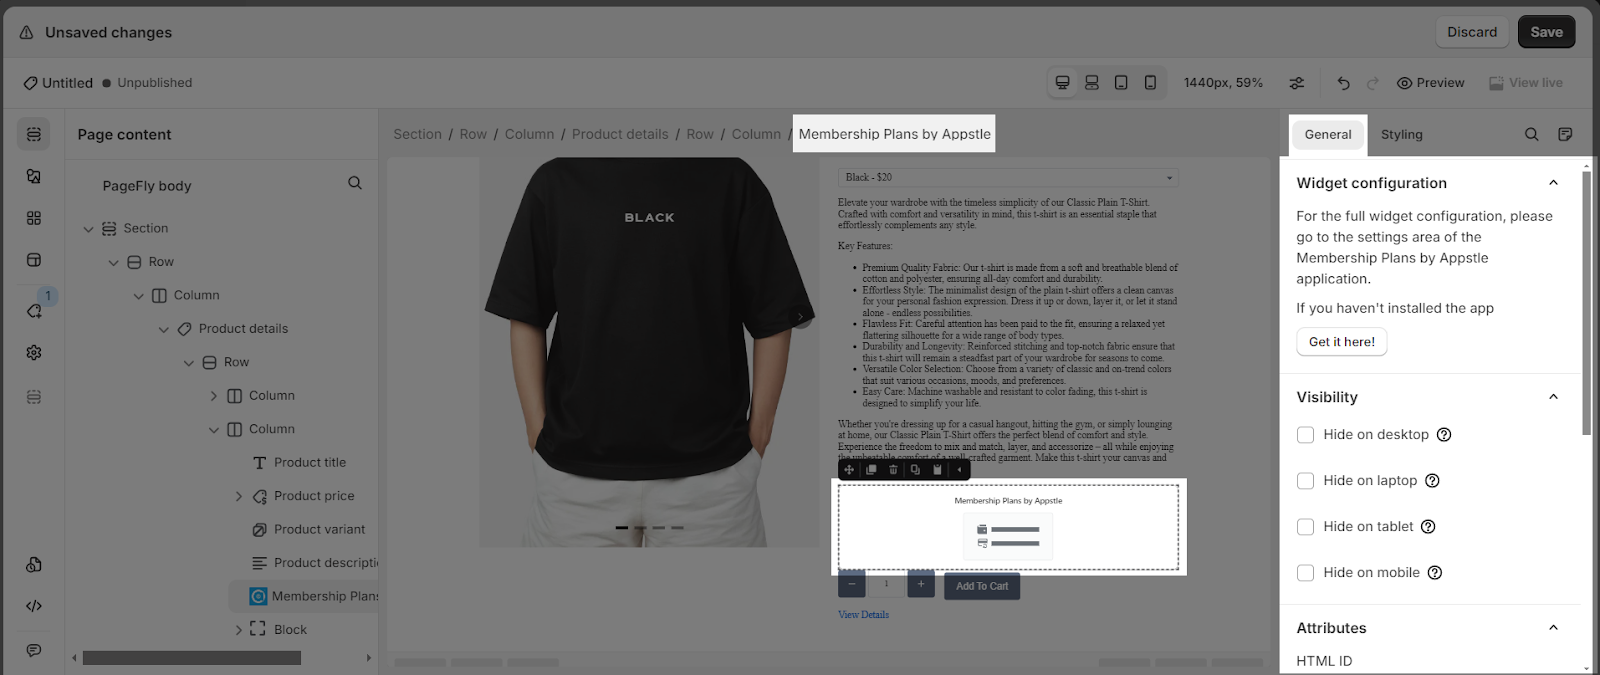
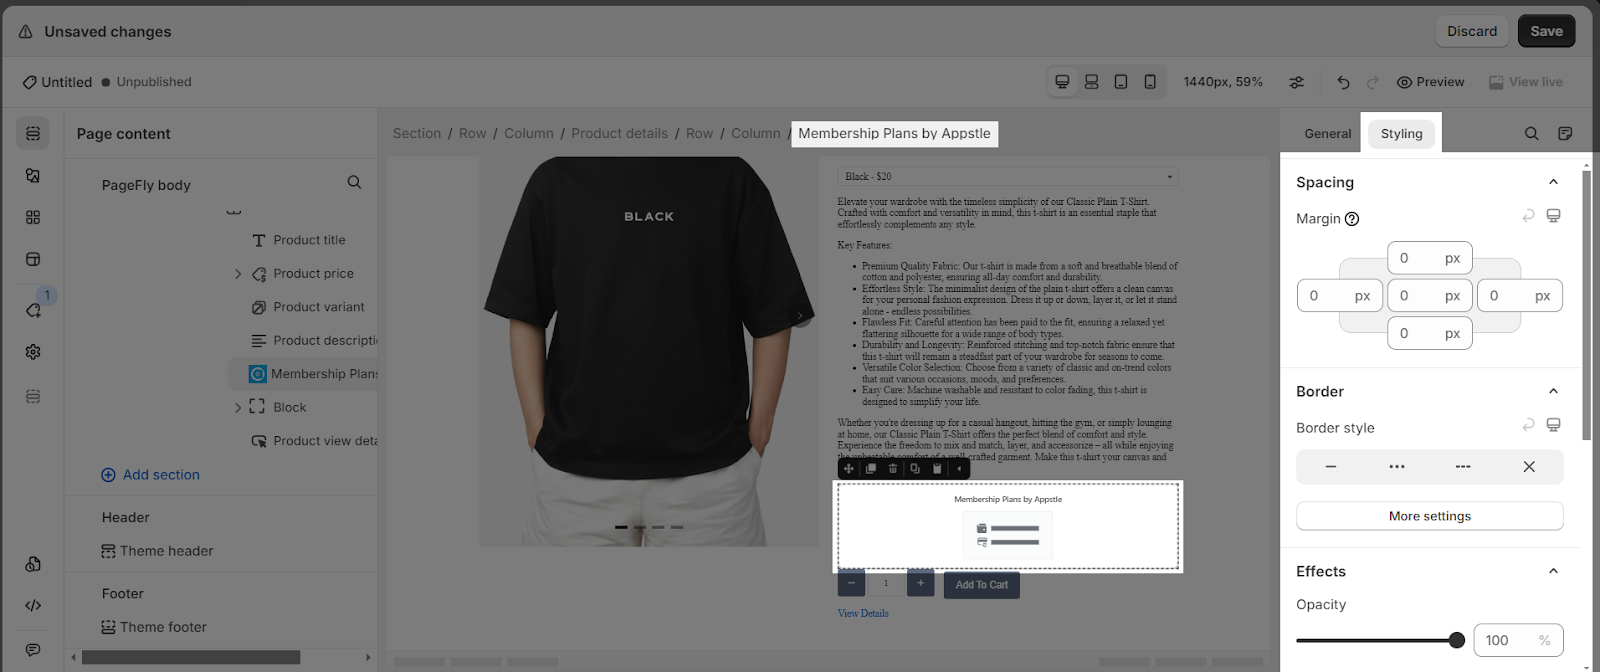
After adding the Appstle Memberships element to your PageFly page, you can customize it using the settings on General and Styling tabs the right sidebar:
General Tab
This tab lets you customize the Appstle Memberships element’s appearance and behavior.
You can check more information about settings in the General tab here.
Styling Tab
Use this tab to define the look of the Appstle Memberships element on your page.
You can check more information about the Styling tab here.
After making your adjustments, remember to click Save and Publish to apply the changes and see the element live on your PageFly page.
Appstle Memberships’ Settings
Step 1: Open Appstle Memberships
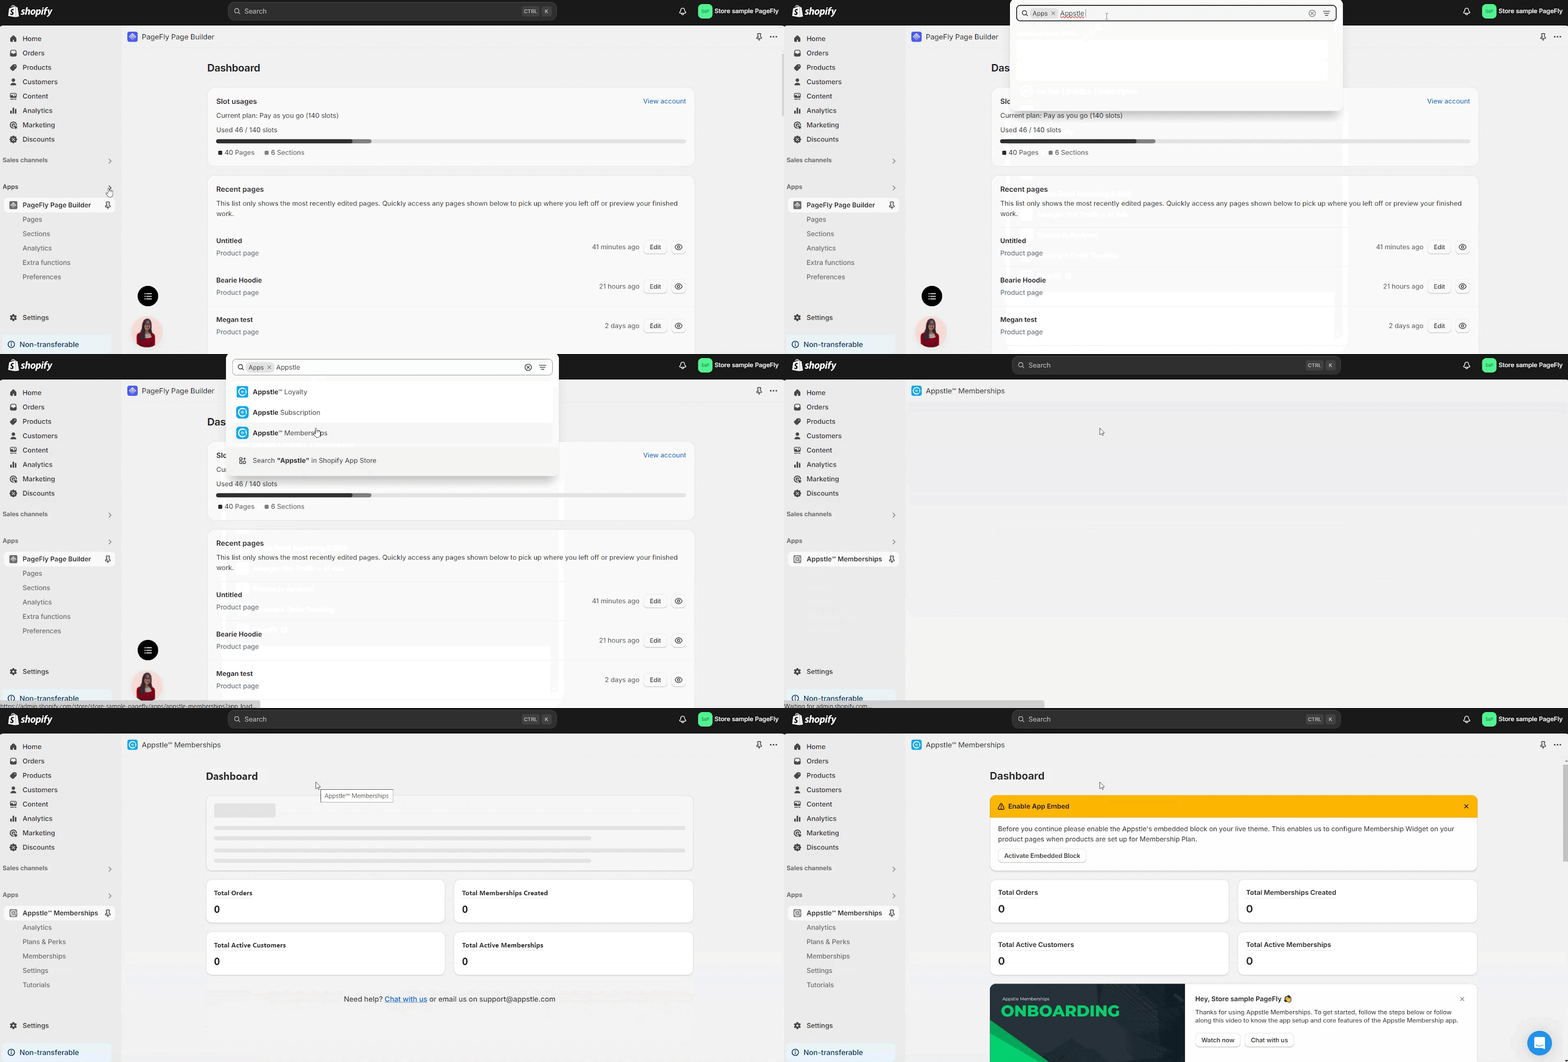
Access the Appstle Memberships app from the Apps section in your Shopify Admin to start setting it up.
Step 2: Create and Configure Membership Plans
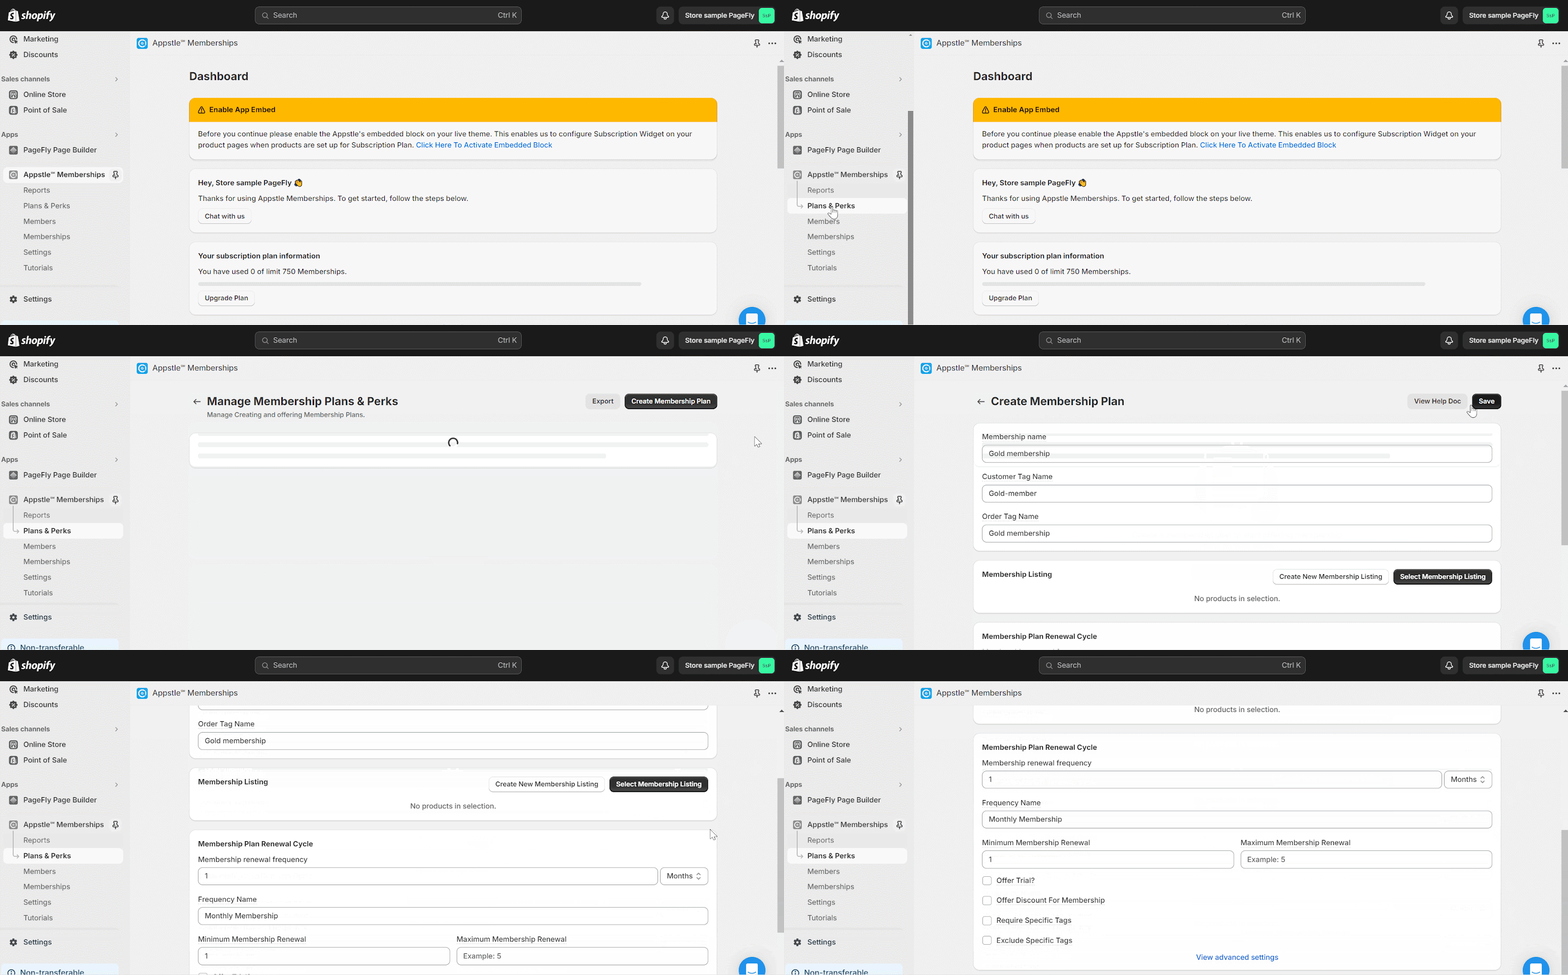
1. In Appstle Memberships’s dashboard, click on Plans & Perks then Create Membership Plan.
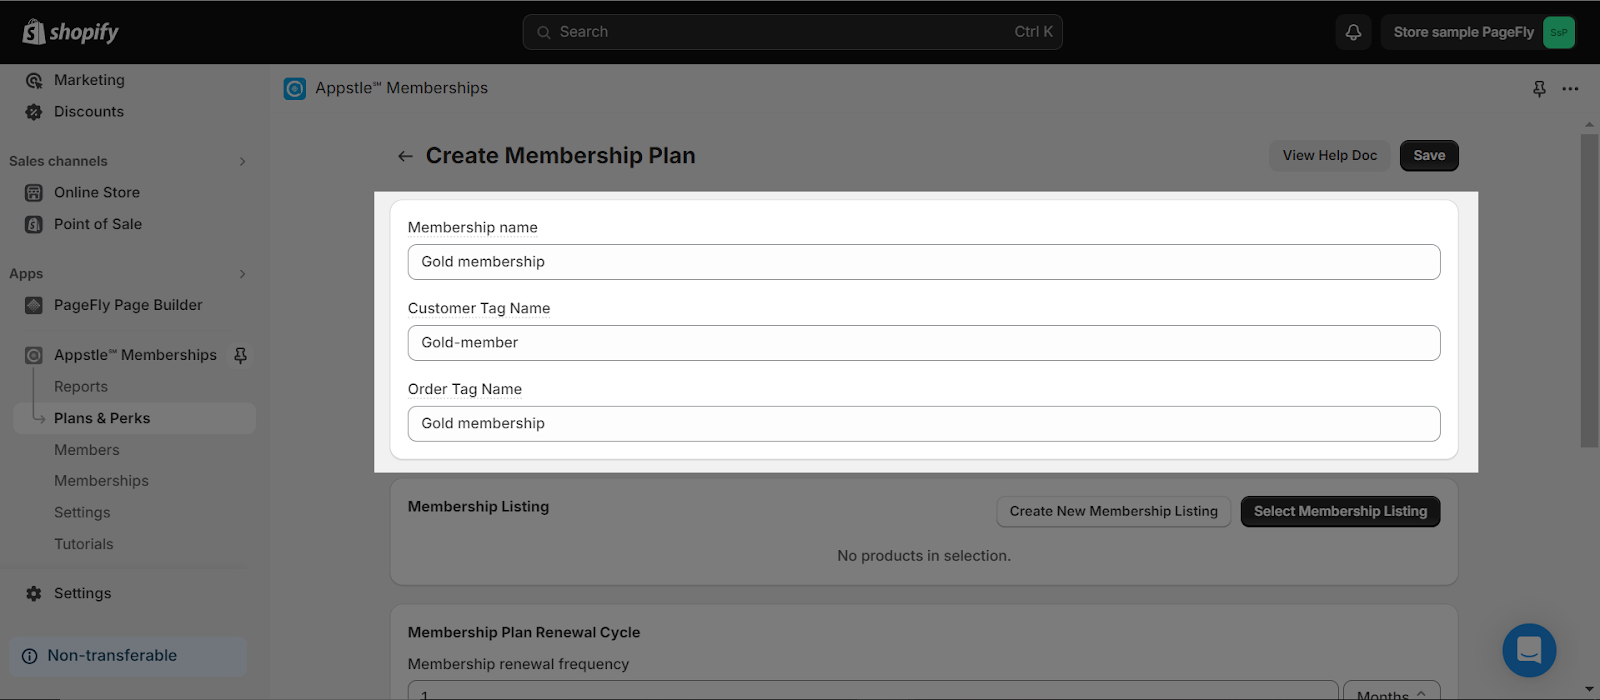
2. Fill out your plan’s details, including Membership name, Customer Tag Name, and Order Tag Name.
3. Hit Select Membership Listing to select the product for your membership plan.
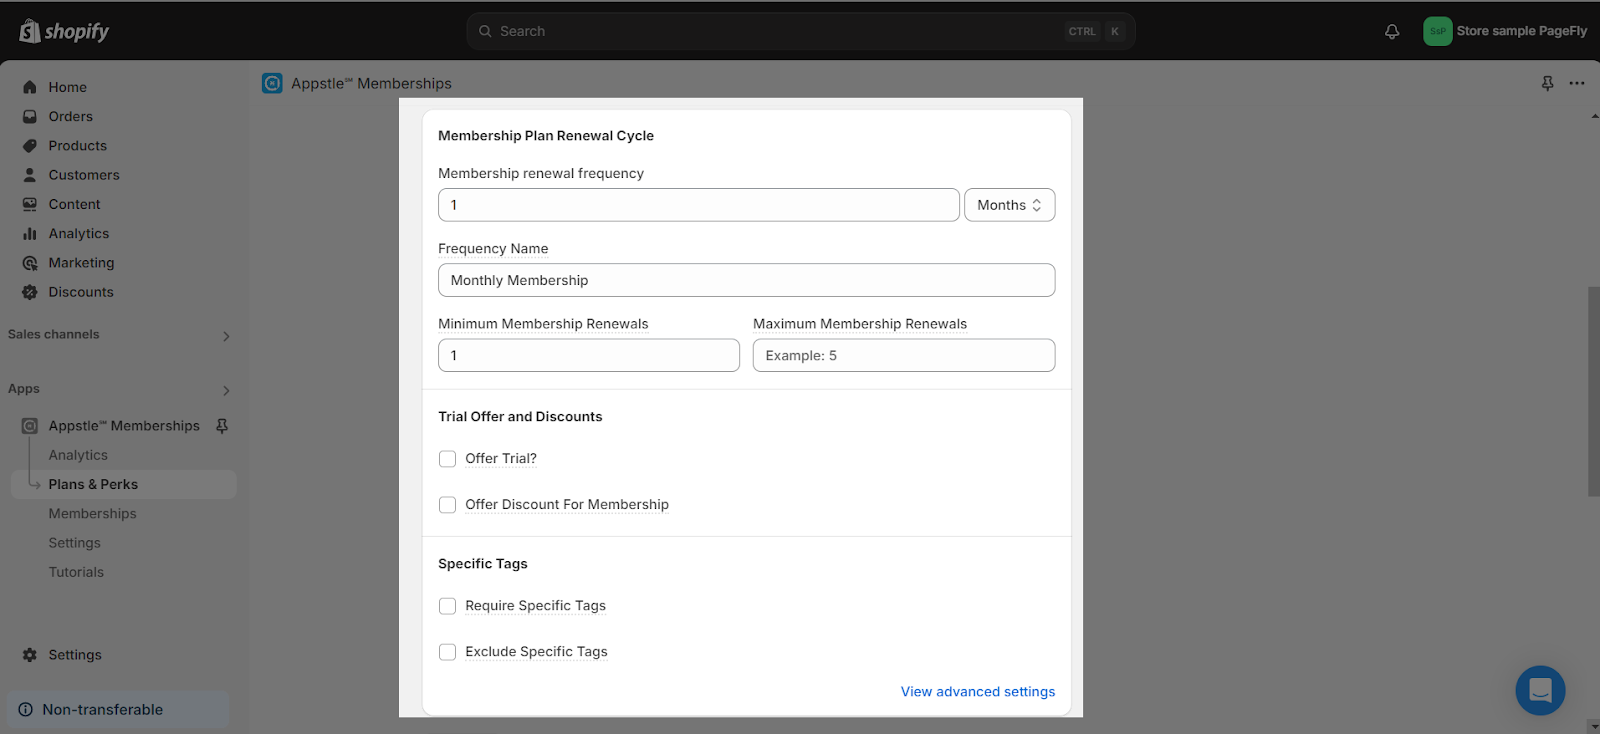
4. Set up the Membership Plan Renewal Cycle.
From here, you can configure:
- Membership renewal frequency: Choose between Days, Weeks, Months, or Years and enter the corresponding number.
- Frequency Name: Provide a name for the renewal frequency, such as ‘Monthly Membership’.
- Minimum/Maximum Membership Renewal: Set the minimum and maximum number of billing cycles for the membership.
- Trial and Discounts: Check options to offer a trial period, apply discounts, and manage customer tag requirements for the membership.
- View advanced settings: Click to set a specific renewal day if needed.
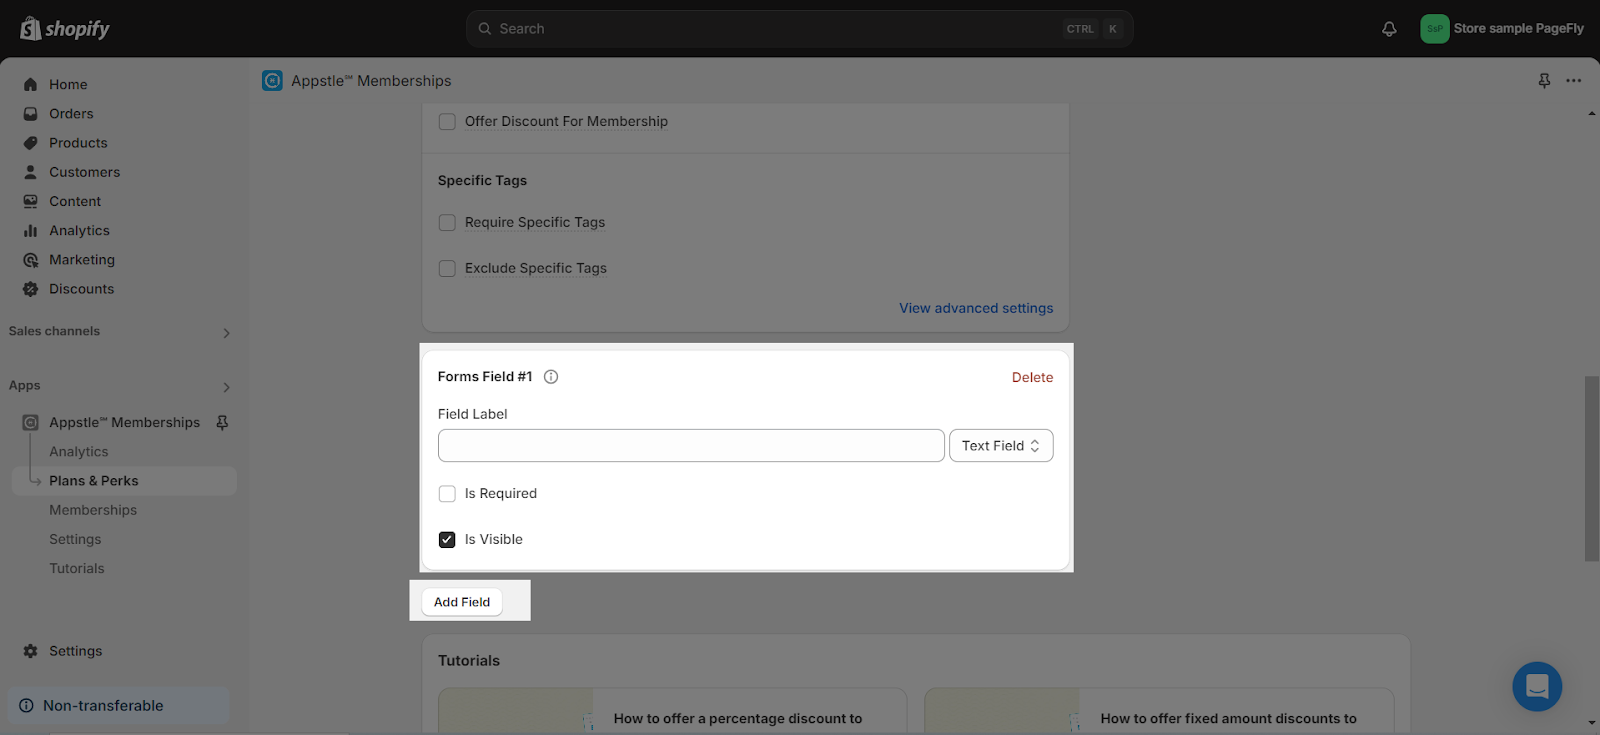
5. Set up the Form Fields to collect customer information.
- Click Add Field > enter Field Label and choose Field Type from text field, dropdown, checkbox, radio group, or date field.
- Determine if the field is required and if it will be visible.
6. After configuring, hit Save to apply your settings.
Common Cases
Membership Visibility on Different Devices
When using Appstle Memberships with PageFly, a common issue that might arise is the inconsistency in how membership options appear on different devices, such as desktops, tablets, or smartphones.
In this case, please try these solutions:
- Adjust Visibility Settings: Modify the Visibility settings in PageFly for the Appstle Memberships element to ensure it shows up on all intended devices.
- Responsive Testing: Use PageFly’s preview feature to test how the membership options appear on different devices and make any necessary adjustments.
- Responsive Design: Tweak the spacing and styling options in PageFly to create a responsive design that adapts well to all screen sizes.
- Custom CSS: Employ custom CSS with media queries to fine-tune the appearance of the membership elements for specific devices.
Frequently Asked Questions
1. Can I offer trial periods for my membership plans?
Yes, Appstle Memberships allows you to offer trial periods. When setting up your plan, simply check the ‘Offer Trial?’ option.
2. Is it possible to provide membership discounts?
Absolutely, you can offer discounts to members by checking the ‘Offer Discount For Membership’ box during the setup of your membership plan.
